User Authentication
To integration User authentication with a frontend application, you need to configure either of the supported strategies in Frontier. Frontier is a multi-tenant authentication server, so you can configure multiple strategies and use them in different applications. Each tenant has its own organization and each organization can have its own set of allowed authentication strategies. For now, if a strategy is enabled in Frontier configuration, it is available to all the organizations.
Supported Strategies
- Social Login - Google, Facebook, Github, etc.
- Email OTP - Send a one time password to user's email address.
You can list all enabled strategies by running the following command
- HTTP
$ curl --location 'http://localhost:7400/v1beta1/auth'
--header 'Accept: application/json'
Social Login
Get the client id and client secret from the third party provider and configure it in the oidc_config section of the
config.yaml file.
To get OIDC configuration for Google, you can visit the following URL https://console.developers.google.com/ and create a new project. You’ll also need to create OAuth 2.0 credentials for the project since Google does not do that by default. From the sidebar, click the Credentials tab, then click Create credentials and choose OAuth client ID from the dropdown.
Make sure you select the application type as Web application. Along with
basic information about the application it will also ask you for the Authorized redirect URIs. You need to specify
the external URL of your Frontier server with the path /v1beta1/auth/callback. For example, if your Frontier server is
running at https://frontier.example.com, then the redirect URI will be https://frontier.example.com/v1beta1/auth/callback.
Or if frontier server is running behind a proxy server, you need to specify the external URL of the proxy server which will
then forward the request to Frontier server at /v1beta1/auth/callback.
This callback url is used by the third party provider to redirect the user back to the Frontier server after successful
authentication. Same config needs to be specified in the callback_urls field of the config.yaml file.
callback_urls is required to generate the login URL for the third party provider that initiates the authentication
flow.
app:
  port: 8000
  grpc:
    port: 8001
  # cors_origin is origin value from where we want to allow cors
  cors_origin: ["http://localhost:3000"]
  # configuration to allow authentication in frontier
  authentication:
    # to use frontier as session store
    session:
      # both of them should be 32 chars long
      # hash helps identify if the value is tempered with
      hash_secret_key: "hash-secret-should-be-32-chars--"
      # block helps in encryption
      block_secret_key: "block-secret-should-be-32-chars-"
    # once authenticated, server responds with a jwt with user context
    # this jwt works as a bearer access token for all APIs
    token:
      # generate key file via "./frontier server keygen"
      # if not specified, access tokens will be disabled
      # example: /opt/rsa
      rsa_path: ""
      # issuer claim to be added to the jwt
      iss: "http://localhost.frontier"
      # validity of the token
      validity: "1h"
    # public facing host used for oidc redirect uri and mail link redirection
    # e.g. http://localhost:7400/v1beta1/auth/callback
    callback_urls: ["http://localhost:8000/v1beta1/auth/callback"]
    # oidc auth server configs
    oidc_config:
      google:
        client_id: "xxxxx.apps.googleusercontent.com"
        client_secret: "xxxxx"
        issuer_url: "https://accounts.google.com"
A sample demonstrating the flow can be found in examples directory.
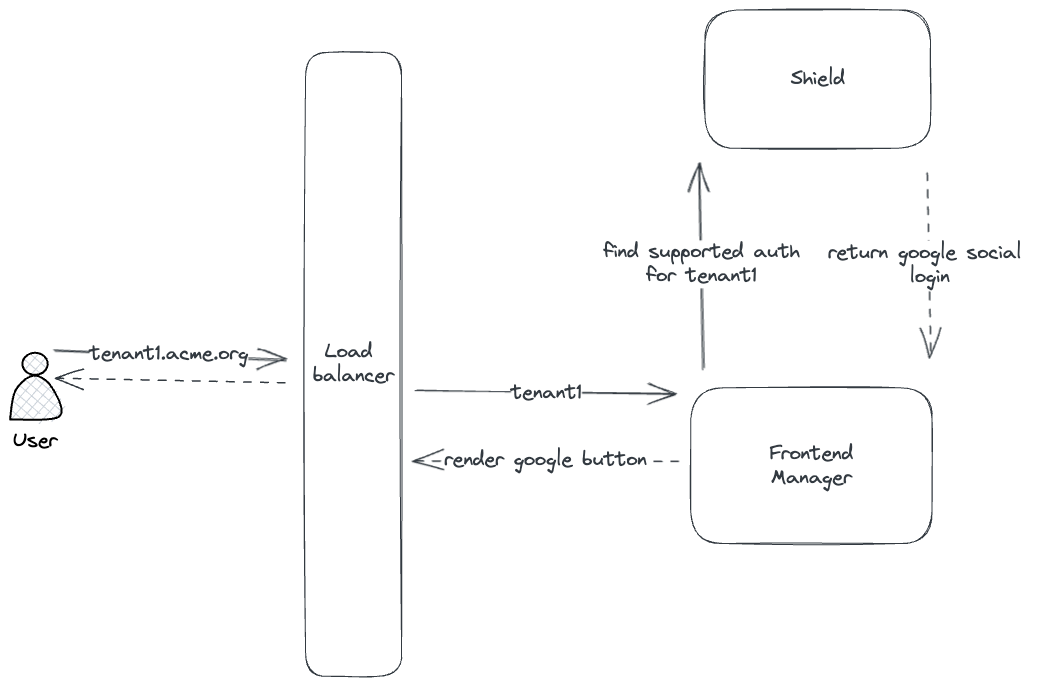
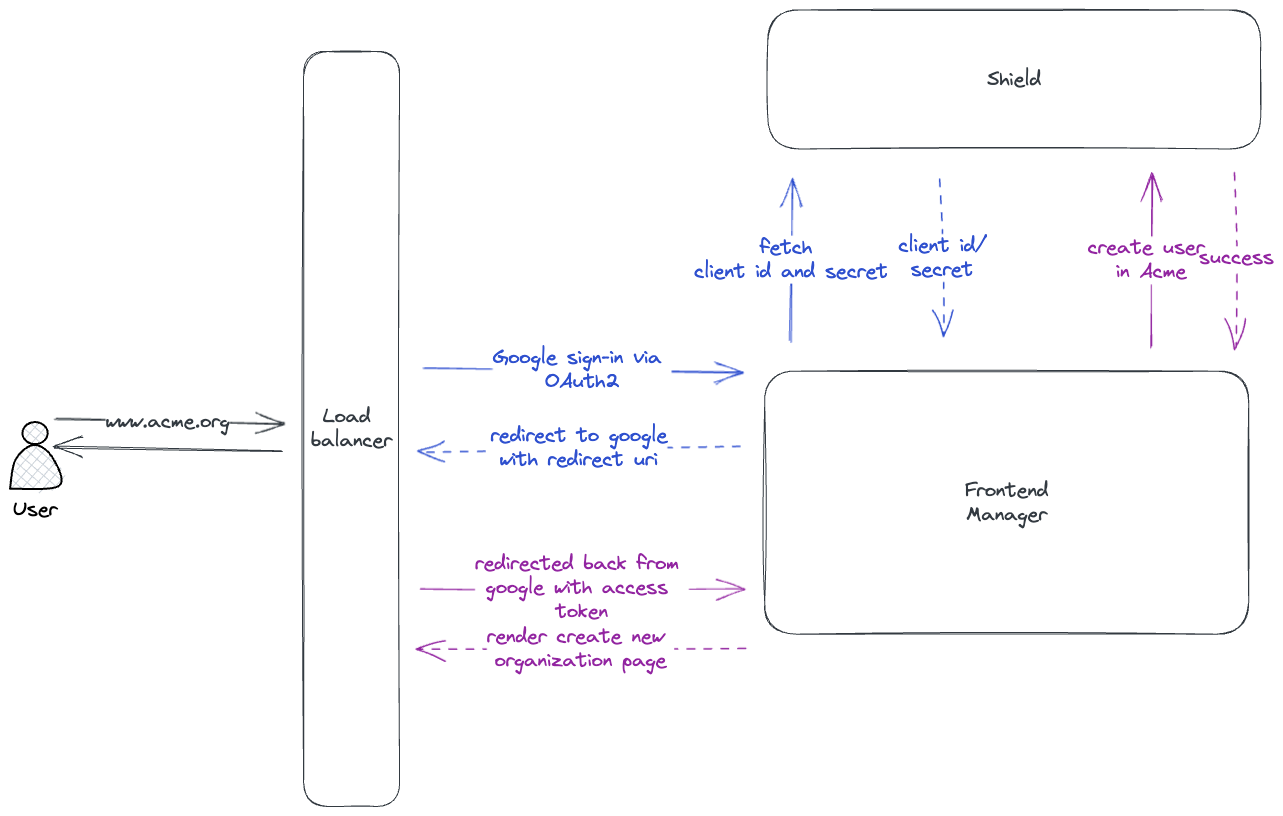
Sample flow for Google OIDC is as follows:
- User goes to login page in the frontend application. Frontend application queries Frontier server to fetch supported authentication strategies and then renders the login page with the supported strategies.
- User clicks on the Google button in the frontend application. Frontend application requests Frontier server to generate
a login URL for Google.
- HTTP
$ curl --location 'http://localhost:7400/v1beta1/auth/register/google'
--header 'Accept: application/json' - Response from Frontier contain the endpoint URL using which frontend application redirects the user to Google's login page.
- Once user is logged in to google, Google redirects the user back to the frontend application with an authorization code.
- Frontend application sends the authorization code to Frontier server. Frontier server verifies the code with Google and register's a new user if this is the first time user is logging in.
- Frontier server then creates a session and return the session details in cookies of the response headers.
- Frontend application then redirects the user to the home page and browser saves the cookies.
- Now all subsequent requests from the frontend application will have the cookies in the request headers.
Email OTP
To use email OTP, you need to configure the SMTP server details in the config.yaml file.
app:
  port: 8000
  grpc:
    port: 8001
  # cors_origin is origin value from where we want to allow cors
  cors_origin: ["http://localhost:3000"]
  # configuration to allow authentication in frontier
  authentication:
    # to use frontier as session store
    session:
      # both of them should be 32 chars long
      # hash helps identify if the value is tempered with
      hash_secret_key: "hash-secret-should-be-32-chars--"
      # block helps in encryption
      block_secret_key: "block-secret-should-be-32-chars-"
    # once authenticated, server responds with a jwt with user context
    # this jwt works as a bearer access token for all APIs
    token:
      # generate key file via "./frontier server keygen"
      # if not specified, access tokens will be disabled
      # example: /opt/rsa
      rsa_path: ""
      # issuer claim to be added to the jwt
      iss: "http://localhost.frontier"
      # validity of the token
      validity: "1h"
    mail_otp:
      subject: "Frontier - Login Link"
      # body is a go template with `Otp` as a variable
      body: "Please copy/paste the OneTimePassword in login form.<h2>{{.Otp}}</h2>This code will expire in 10 minutes."
      validity: "10m"
  # smtp configuration for sending emails
  mailer:
    smtp_host: smtp.example.com
    smtp_port: 587
    smtp_username: "username"
    smtp_password: "password"
    smtp_insecure: true
    headers:
      from: "username@acme.org"
A sample demonstrating the flow can be found in examples directory.
Sample flow for email OTP is as follows:
- User goes to login page in the frontend application. Frontend application queries Frontier server to fetch supported authentication strategies and then renders the login page with the supported strategies.
- User enters the email address and clicks on the Email OTP button in the frontend application. Frontend application
sends the email address to Frontier server to start the login flow.
- HTTP
$ curl --location 'http://localhost:7400/v1beta1/auth/register/mailotp?email=example%40example.com'
--header 'Accept: application/json' - Frontier server sends an email to the user with an OTP and returns a state in the response.
- User enters the OTP in the frontend application and clicks on the Verify button. Frontend application sends the OTP
to Frontier server to verify the OTP along with the state returned when the flow was created.
- HTTP
$ curl --location 'http://localhost:7400/v1beta1/auth/callback/?code=XXXXXX&state=XXXXXX'
--header 'Accept: application/json' - Frontier server verifies the OTP and creates a new session.
Request Verification
Once the user is verified and logged in, a session is created using cookies in user's browser. This is how the flow looks like:
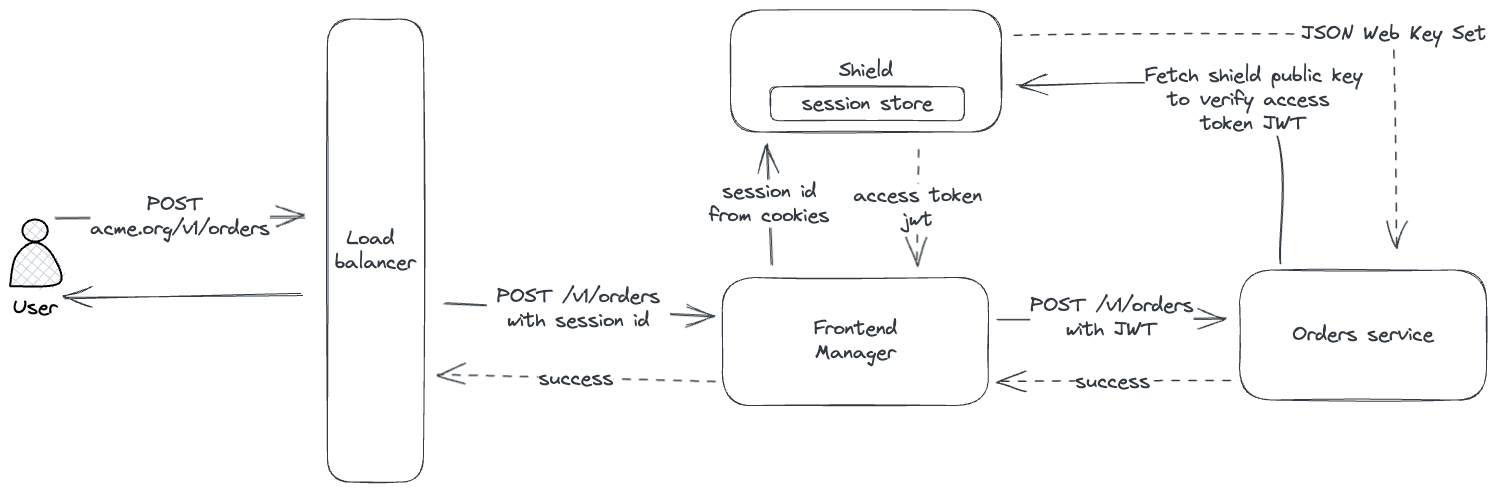
- User logs in using the frontend application.
- The frontend application sends a request to the Frontier server with the cookies containing session details.
- Frontier server verifies the session and returns a JWT access token.
- The frontend application forwards the request to backend microservices with access token.
- The backend microservices verify the access token using Frontier's public keys, if the token is valid, the request is processed.
Access token by default is returned as part of the response header "x-user-token" after successful login. This can be
requested again by sending a post request to the Frontier server with the cookies containing session details on endpoint
/v1beta1/auth/token.
Frontier only generates the access token if the RSA keys are configured in the config.yaml file. If the RSA keys are not
configured, we can still use Frontier as a session store and verify the session in the backend microservices. RSA keys are
configured under app.authentication.token section in the config.yaml file.
To configure token rsa_path you can use frontier cli and run ./frontier server keygen command which will generate
2 RSA keys.
For simpler integrations, the frontend application can also choose to work as an identity aware proxy. In this case, the frontend application will verify the session and forward the request to backend microservices where backend microservices will assume all the request coming from the frontend application are authenticated.
Frontend Manager can also be replaced by a reverse proxy like Kong, which will do the same job as the frontend.

The JSON Web Key Set (JWKS) is a set of keys containing the Frontier's public keys used to verify any JSON Web Token (JWT)
using the RS256 signing algorithm. Frontier generated access token can be validated using the public key of the RSA key
pair. The public key can be fetched from the Frontier server from the endpoint /.well-known/jwks.json.
The key set can contain more than one key and is uniquely identified by the kid field. The JWT contains the kid field
in the header which is used to identify the key used to sign the JWT.